Wednesday 20 November 2013

Video - Huge Pom Pom Made Easy


Don't you just love it when you find an easy way to do something?

Take a look at this youtube video and find out how to make a huge pom pom the easy way.

Link will open up in new window

Pom Pom It

And while we are talking pom poms - how about creating a mini one using a dining fork too?

How To: Make a Mini Pompom with a Fork


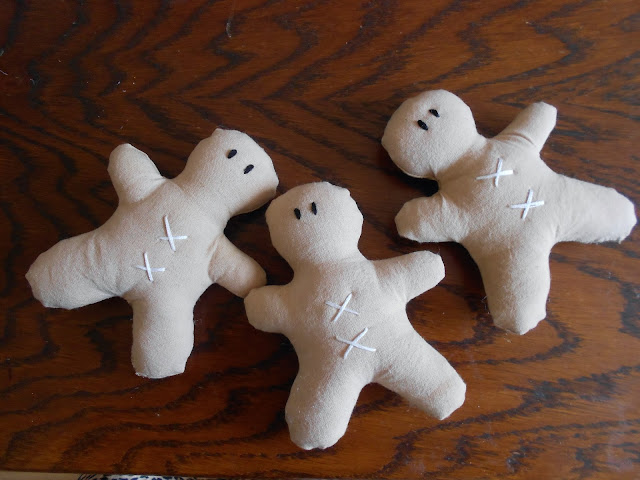
Tutorial - Vintage Look Gingerbread Men


NOTIONS:

* Tracing paper
* Tea stained fabric (or one of your choice)
* Coloured thread to compliment fabric
* Toy Filling
* Embroidery thread in black and white 
* Glass dish
* White Fabric paint
* Piece of paper
* Scouring sponge
* Ribbon bows


Take your tea stained fabric and copy the gingerbreadman shape below. You can make it bigger if you need to. 
You can trace the pattern straight off your screen just make sure you do not press to hard.


Place shape on double folded fabric as each one needs a front and a back - it does not matter if the staining on the fabric is different on each side. In fact it helps add to the effect of the finished item been vintage.

Cut out as many as you need and then sew round the outsides, preferably not too close to the edge to prevent fraying when you turn right side out. I used a sewing machine but you could sew these by hand if you want to.

Leave a hole big enough for you be able to turn the figures right side out, I left mine on the inside of the leg as it is easier to disguise.


Once you have them all sewn up, turn right side out as shown below, and gently fill with toy filling. Do not overfill as it will add to weight of finished item which is not recommended for decorations.

Sew up hole on leg by tucking in raw edges and using small stitches in complimentary coloured thread.


Now onto the fun part of decorating your stuffed figures.

You will need embroidery thread in black and white. Use the black and french knots to create the eyes.


In the white, do two crosses on the body of the figure, try not to be to uniform in these. 

Don't worry about tying off in the knotted way, just sew up through the inside of the figure and out through the back, and then snip as close to the fabric as possible, taking care not to snip into figure. Gently nip the fabric and lift near the thread end and it will go back into figure.


Next take the white fabric paint, a sponge, piece of paper and a bowl in which to pour paint.

Pour paint into dish and grab sponge.


I used the rough, scouring side of a washing up sponge for effect. Dip the sponge into the paint and blot onto a piece of paper until you get a bubble effect. 

When you have removed the excess paint and are happy with the amount on sponge start to mottle the gingerbreadmen on the top of arms, sides of legs and top of head. Anywhere where frost or snow might naturally gather, there are no hard and fast rules.


Next you need little ribbon bows - you can use pre made ones or create them yourself using the easy fork method


put the thread through the bck of the bow and sew securely to to the figure.


You now have your finished figures to do with what you want.

Stay tuned to this blog to see what I used them for.


Tutorial - Tea Stain Fabric


HOW TO TEA STAIN FABRIC:


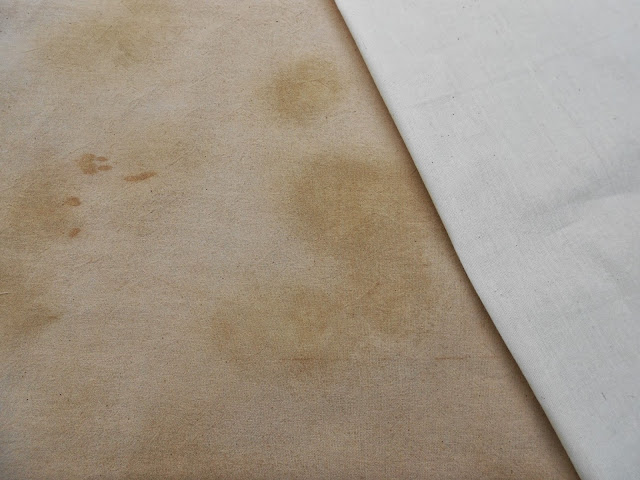
Photo shows tea stained fabric on left next to original undyed fabric


Take a piece of clean, plain fabric preferably of cotton or a dyeable fabric.

Place 8 - 10 teabags into a large enough rigid container - I used the washing up bowl. Pour boiling water over the teabags enough to release the tea and fill the bowl enough to cover your fabric piece.

Place the fabric into the bowl of tea and make sure it is all covered and wet. Please use a utensil of some sort to push fabric down - not your hands. 

Leave fabric steeping/soaking in tea for as long as possible until water is cool. 

Take out newly dyed fabric and rinse in cold water.

I did not wash this fabric after dying it but you can handwash if you want. The tea staining should stay in the fabric but may become lighter.

Let fabric dry naturally.

Iron before use.

Use fabric as normal.


What Ever Happened To Those Bird Houses?


SHABBY CHIC CHRISTMAS


Have you been wondering what happened to those birdhouses that featured way back in July in the explanation of how to 'distress' wood?  


Well wonder no more as here they are in their full glory.

Each one is slightly different despite been decorated with the same kind of trimmings and materials.

I am pleased at how they turned out and have sold one already - the rest are of to a Christmas craft fair.

If you have any questions on any aspect of this project feel free to mail me or leave a comment.


Tuesday 17 September 2013

Fun Fur Owl - NEW KNITTING PATTERN


FUN FUR OWL - NEW KNITTING PATTERN

Recently the area where I live was battered by extensive rainfall in a short period of time, this caused a lot of damage to people's property and caused chaos on the roads for around 24 hours. By far one of the saddest stories was of a local owl centre that also doubles up as a wildlife rescue/recuperation. They ended up under 4 foot of water within a matter of minutes and didn't have time to rescue all of the birds in their care - the result was the sad loss of 9 birds. They also lost all of their stores of bedding, feed etc. The plea went out for assistance in cleaning up the centre and donations of items lost. Us North East people are known for our generosity and the centre was inundated with much needed replacement items but the centres cash reserves have also been drained.

I unfortunately could not assist financially but I have cupboards and boxes full of yarn and fabric so set about making something that they can sell in the little shop at the centre when they re-open.

Hence the creation of the Fun Fur Owl, he took a bit of time to get right and their are a few 'oddities' that now live in my daughters bedroom (she has taken it upon herself to adopt all the mistakes I  make). Eventually the vision I had in my head appeared and I want to now introduce them.


I have 8 at the moment made and they also seem to adopt their own personality. I have managed to get 3 out of one 50g ball of fun fur. 

The creation of these little guys has also brought about a new 'It's By Clare' knitting pattern, which will be available shortly, I have just had one more idea that I want to try and may add to the pattern before release.

Cost of pattern will be £2.00 if ordered as the PDF version and £2.50 if ordering as a printed version (postage extra). This is a special price to celebrate it's release. It would be nice if any pattern buyers could make one up and send it to the centre so that they can sell it. I can give you the details on purchase if you want them or if you would just like to donate to the Owl centre


Saturday 3 August 2013

Needle Felt Rabbit


Every now and again I will dabble in a bit of needle felting. For those who don't know what needle felting is there is a quick description below.

One day last week I got the 'creative urge' to make a life-size rabbit. After many, many hours and stabbings of my fingers enough to draw blood, I am pleased to say the bunny is finished.

I still want to make him a carrot or two, but other than that here he is.


Needle felting is a popular fibre arts craft that creates felt without the use of water. Special needles that are used in industrial felting machines are used by the artist as a sculpting tool. While erroneously referred to as "barbed" needles, they in fact have notches along the shaft of the needle that grab the top layer of fibres and tangle them with the inner layers of fibres as the needle enters the wool. Since these notches face down towards the tip of the needle, they do not pull the fibres out as the needle exits the wool. Once tangled and compressed using the needle, the felt can be strong and used for creating jewelry or sculpture. Using a single needle or a small group of needles (2-5) in a hand-held tool, fine details can be achieved using this technique, and it is popular for 2D and 3D felted work.


Sunday 28 July 2013

Tutorial - Age Items Using Paint & Wax


I bought some unpainted birdhouses back in April and have sat and ummed and ahhed at them since then. It worked and I am now making them into Christmas decorations.


They have just had the paint wax treatment to make them look aged and are ready to be decorated. Photos to follow.

HOW TO AGE ITEMS USING PAINT & WAX TREATMENT:

I have used childrens paints in a bottle as the finished product will be an indoor feature with not much use. If you wish to do this on an item which has been sanded and cleaned such as furniture then ordinary emulsion paint is best.

Choose your underlay coat and paint the item in this colour.

Leave to thoroughly dry.

Take a white coloured candle and rub all over the item - it doesn't matter if you do not manage to get little crevices and difficult corners as this all adds to the finished look of your aged item.

Clean off any excess wax - a dry paint brush is good for this.

Paint your piece again but this time in white making sure you get a good covering. To completely cover it may take a few coats. Make sure each coat is allowed to dry thoroughly before apllying another.

When the last top coat has dried arm yourself with a few sheets of fine grade sand paper.

Gently rub all over your item and you will see the top coat start to lift and the colour of the undercoat appear.

Keep sanding till you get your desired effect - age usually starts to show worse on corners so pay particular attention to them.

When you have got the look you want it is fine to proceed with your decorating on small items. However, if it is furniture you will need to wax over the completed item to help prolong the effect. You can do this by using a pot of beeswax and a soft cloth to apply.

* Another way to get the distressed effect on small items is to apply the top coat very thinly, leave to dry for a few minutes (just enough time for the paint to settle but not dry completely) and then DRY brush the paint as far as it will go along the item.

Have fun...